


| This thing took basically 2 weeks to build, I did it in 3 weeks with the details of the roofing and other items but I had the first fire in 2 weeks. I worked on it during the weekends and most days after work. I did have a total of 4 days delay due to rain but luckily I was able to let the concrete set during those days. As I write this, it is 3 months later (Jan, 2003) and I have not finished the tiling but I have used the oven A LOT. I also had family problems that forced me to Europe as a excuse for not having the tiles finished. If you are thinking about doing this, I found it actually easy to do masonry work but after a week or so, it sure was tiring to go out there, it might have been better if I could work on it 8 hours a day on it. I was sure anxious to finish it and get the work over with. The construction is not rocket science its hard physical work but nothing the average person can't do. The only "guessing" part I had to do was the chimney part, I started off with too short a chimney, John at Mugnaini had warned me I might not have enough when I bought it but he thought it would work. I think it could have but adding 2' sure helped a lot. | |
| The Saturday Team...Tad and my Wife and the Dogs derriere behind them. Oh yeah, I am taking the picture so I am not in it, but trust me I am part of the team. | 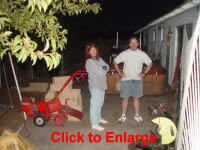 |
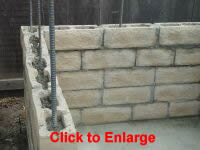
| The slab is 54" x 59 1/2. Tad suggested pilons at the corners to get a better bite to the ground, I had read about that and thought it was a great idea. The holes are 12" deep at each corner. The rebar was welded together, I later found out that is bad and it should be tied. | 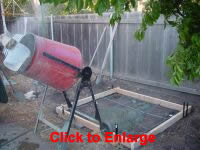 |
| 12 bags of 90lb. concrete...I found it easier than getting sand/gravel delivered to do it with bags and much cheaper than cart-crete. (Saturday) | 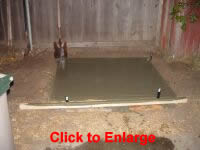 |
| 3 rows done, my very first time doing mason work...don't look at the back wall where I forgot to offset the bricks..oops. (Monday) |  |
| The rows of bricks are done. 5 courses (getting techy talking here) done and mortared, height is 29 1/2 inches, I had planned on 30 so close enough. Mugnaini recomends 28" but that seemed short to me based on readings on the web.(Tuesday) 47 Blocks and 8 1/2 Blocks and 4 Bags of 50lb. Mortar |
 |
| Ok, filled all the holes with Concrete and added more rebar. One bag filled 4 sometimes 5 holes. (Wednesday) |
 |
| I sure hope this holds when I pour the 6in. of concrete | 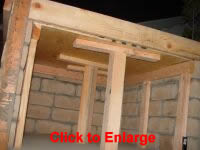 |
| more of the form for the layer of concrete. Even though there will be yet another layer of concrete, I used Tad's laser level to make sure the 2x6 is level. I was very careful while laying the blocks but somehow the back right corner was 1/4" off level. It will be fixed when I pour the slab. | 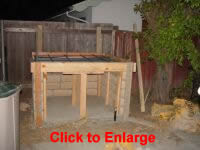 |
| I am not comfortable with a 6in. slab holding on to a heavy $3,000 oven even though Mugnaini says use rebar I still was not sure. So I added angle iron, you can't see it here but the iron is held up about 1in. from the plywood, I know the angle iron alone will hold the oven and it only cost $14 for it. I will HATE taking this thing apart in the future. Although, now that I have tied (not welded) the rebar it sure seems as though it would have been strong enough but the angle iron was already there. That tying the rebar was slow, sure would have been faster to weld it but I am told that is not legal. The angle iron gave me a nice way to hold up the rebar from the plywood. | 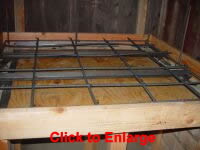 |
| I poured the slab but it was pouring down rain so its covered by a tarp...picture will go up soon. (Thursday) |
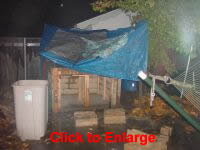 |
| Well the rain finally stopped after 3 days, there was a little damage where rain drops fell onto the wet slab for 3 days but for the most part its fine. The sides of the slab are of course messed up, I don't know how people make the sides good because when I remove the form it looks bad...nothing some tiles and mortar won't fix. (Sunday) |
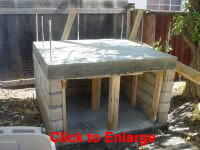 |
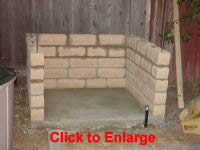
| I removed the wood holding up the slab, I was concerned about that much weight on that little wood while pouring but it held up. Also put on the top bricks. 12 blocks, 2 1/2 blocks, 1 1/2 bags of 60lb. mortar. | 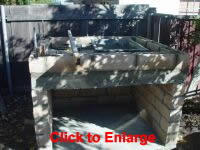 |
| its looking GOOD :) like I said the rough slab will be cleaned up...you will see. |  |
| Well the sand is in...16 bags of 50lb. Sand But I didn't finish the form for the last and final slab. I will get to that during the week. | 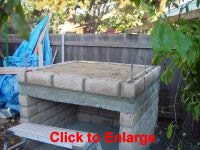 |
| Form is built and the sand is down...ready for last pour. | 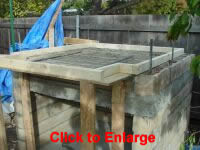 |
| Again, this is my first ever concrete/masonry project and I have no idea how strong it is, so good old steel to the rescue. Just some rebar to hold the ledge up. | 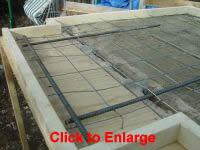 |
| that last pic was just a test...did you notice that the Kraft paper was not down ? | 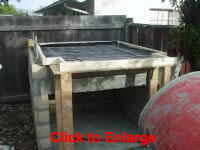 |
| ok, the last slab is poured, YES ! its looking GOOD! I have to move this thing when I move out of this house so I didn't actually mortar the oven floor down. Since its my first time doing concrete work I got the slab pretty dammed level but not uniformly flat and had to put mortar under the floor tiles to get them steady. I didn't want them to stick even though Mugnaini told me I could take them up later. I put the mortar down to even it up and then put wax paper on it and put the tiles on. Next morning I took the wax paper off and voila perfectly flat area for the tiles with a perfect fit. I then chiseled a small spot in the middle (1" dia.) and put in fresh mortar and the tiles. This way they are locked in but hopefully very easily removed. | 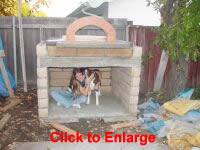 |
| The oven itself is mortared to the slab but with 3/4" masking tape over the seam, then mortar. This way I can cut through the mortar and not have to chisel on the oven when I move it. | 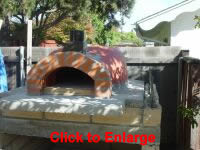 |
| Ready to go at last. I have a cement board to go up front and metal studs so its all fireproof...time to build a roof and start doing some cosmetic tile work. 47 Blocks and 8 1/2 Blocks but this time almost 5 bags of mortar, my wife helped lay these down and we made the mortar a little thicker than the base, on average the mortar is 3/4" thick and the base less than 1/2". Various web sites say 3/8" mortar is a good number but I don't think it will be a problem. |  |
| Click on this one to see measurements...basically the peak had to be cut for the chimney and I wanted 3" clearance even though the specs call for 2". I even thought of cutting the metal bracket to get my 3" but I didn't. You can see the chimney bracket in this one also. I was amazed, it lined up perfectly as if I had planned it that way. | 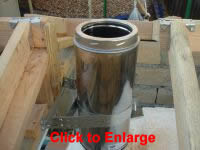 |
| The roof framing finished. |  |
| The front is also finished, I added the middle metal stud and you can see the roof overhang on this one. 4" on the side/back and 14" on the front. All that is left is the front cement board and the roof :) |  |
| Its full of Perlite now, 7 4cu. ft. bags. I called Mugnaini at this point going "oh oh, did I need to cover the black chimney flue with the blanket" since I had not fully covered it. I was reassured I had done OK since the Perlite is not flamable. As you can see in the earlier pictures (plus many other pics I have not posted), it is more covered than I thought when I called, about the same covered as in the Installation Manual pictures, so I didn't need to call after all. | 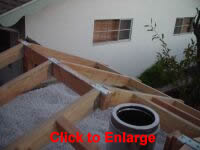 |
| The first fire. I could not wait any longer so I fired it up at this point. You can see the roof is on and I need to finish some minor woodwork by covering up the front (and back) of the roof peak. The front is Cement Board and will be tiled. |
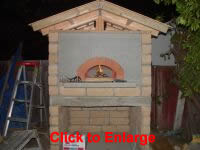 |
| FIRE ! isn't it awesome ? It was actually kind of hard to not over do the fire. I had been told that the first day's fire should be quite small to keep the heat down, just a small one to warm up the inside. So I did one with just kindling and kept an eye on the temperature with my IR thermometer that I use for powder coating car parts. As the kindling only fire started to go out, I added one small log and took this pic, I let that burn out and then made a new one a few hours later. Quite surprising how hot it stayed between the 2 fires. |  |
| Made another fire the next morning, I went to bed at 10:30PM and the oven roof was sitting at around 230degrees. At 7:30AM on a chilly night, the oven roof was at 120degrees. Since I had to go to work, I made a small kindling fire that quickly brought up the oven to 340 and let it go out before I came to work. I will do the same thing at lunch and then a bigger fire tonight, hoping for Pizza tomorrow night (Saturday). | |
| The reason brother-in-laws exists :) Thank You Carl for making the flashing so beautiful. | 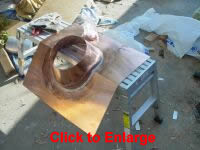 |
| The original chimney I purchased was a 18" section and a 3' section for a total of 4 1/2ft. I was told 4' is pretty much a minimun and I would be ok. I may have been but it didn't draw as much as I thought it should, so my brother-in-law brought over a piece of tubing that we added, 6ft. (+the 18") worked really great but was too tall so we started cutting it down in 12" increments to see where it quit drawing as well. Found that at 4' it worked pretty well which was quite shocking to me since it was only a foot more than was only worked ok. So I got a new piece from Mugnaini, the chimeny now sits at 5'6" the 4' and 18" section that sits below the roof, the joint is about 2 inches below the roof peak. | 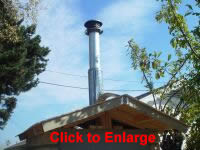 |
| So on the 3rd Saturday after starting I finally had the first pizza after 3 days of small fires, I made pizza...that failure is another story but I am getting better as you can see here. | |
Copyright © 2006 rambour.com